Installing RTE’s applications certificates
RTE’s applications certificates will be installed by "
Cross certification" when you received your first signed-encrypted email from the application.
Note:
The "
Cross certification" is a process which makes a user able to install the certificate of another entity while he receives a message form that entity. Messages sent to that specific entity will be encrypted with that "
Cross certification".
Installing RTE CA’s certificates
Installing RTE Historical CA’s certificate
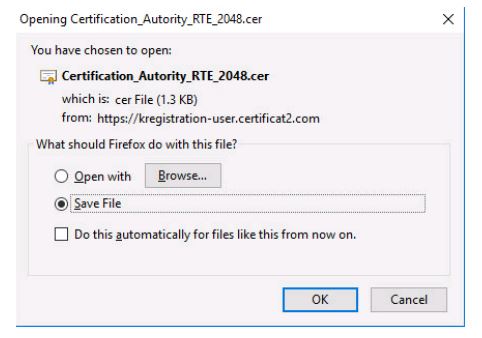
With your web browser go to the address below to download the file "
Certification_Autority_RTE_2048.cer" containing RTE Historical CA’s certificate:
Click the "
Save" button and choose a location to save the file "
Certification_Autority_RTE_2048.cer"
Select "
Save file" then click "
OK". A location to save the file "
Certification_Autority_RTE_2048.cer" will eventually be requested.
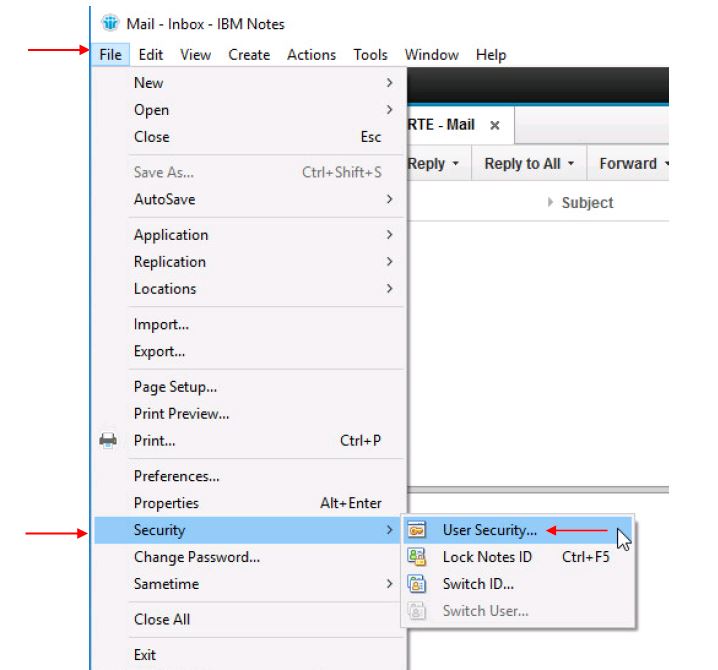
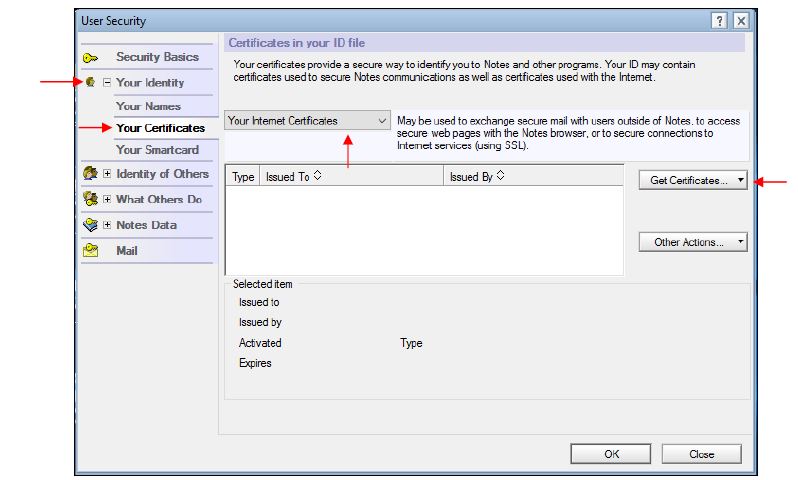
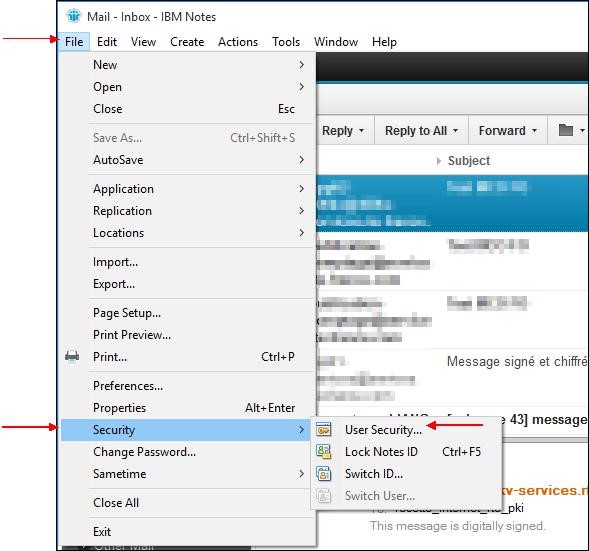
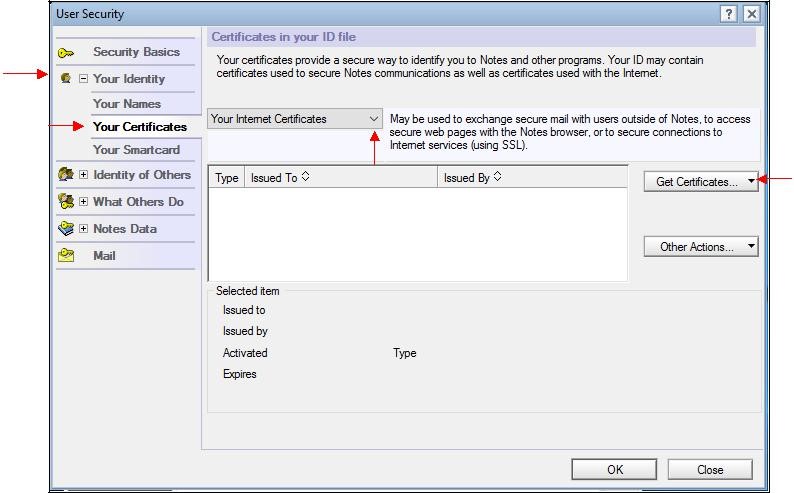
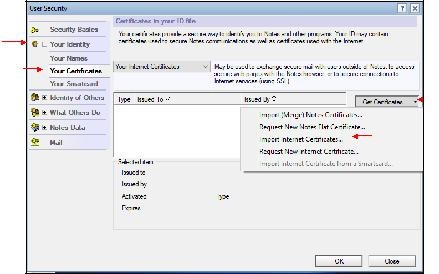
Start Lotus Notes and access to "
File > Security > User Security…":
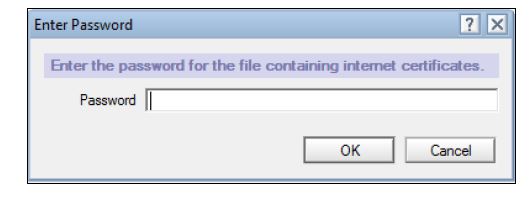
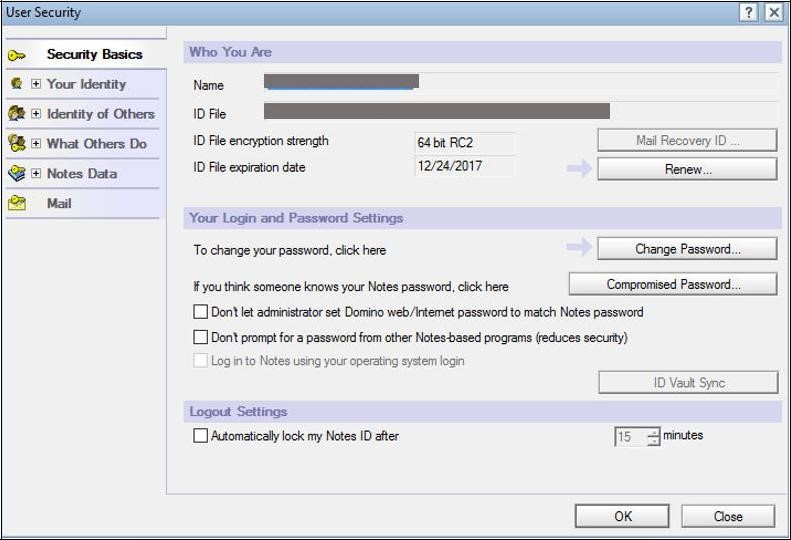
If requested, enter your Notes password.
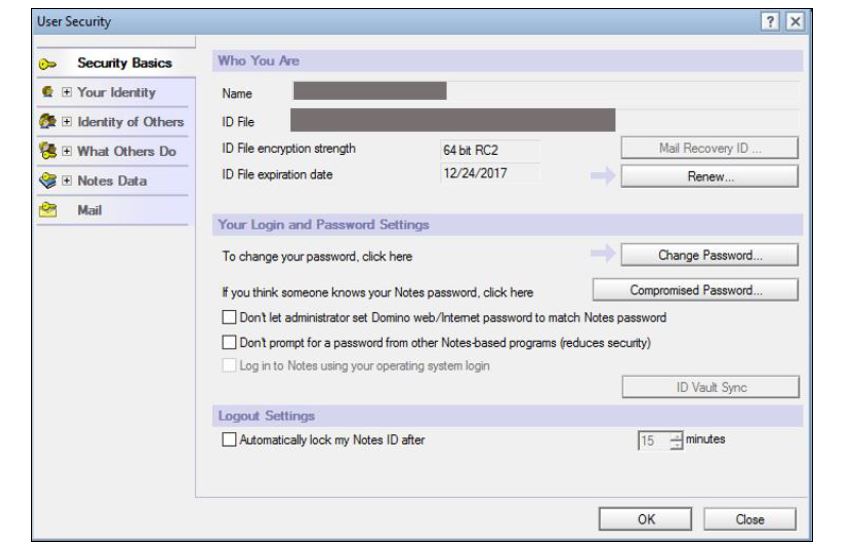
The following window appears:
Click "
Your Identity" then "
Your Certificates":
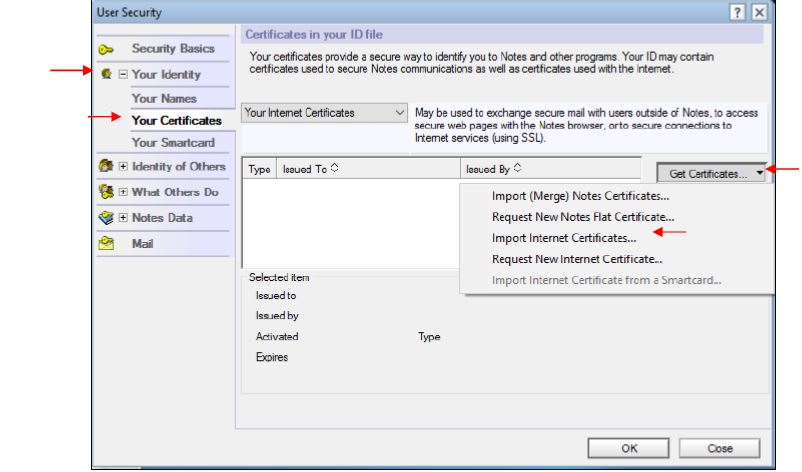
Select "
Your Internet Certificates" in the drop-down list to display the Internet certificates already imported.
Click the "
Get Certificates…" button and select "
Import Internet Certificates…":
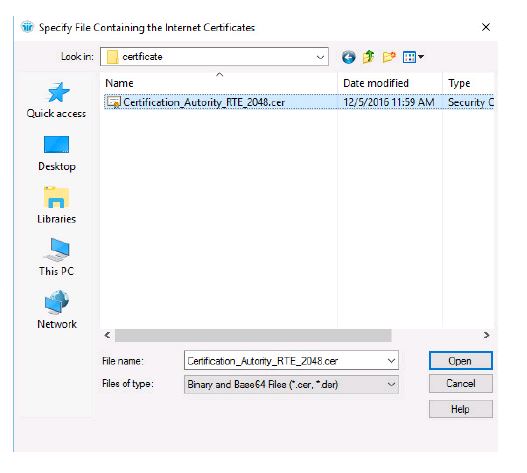
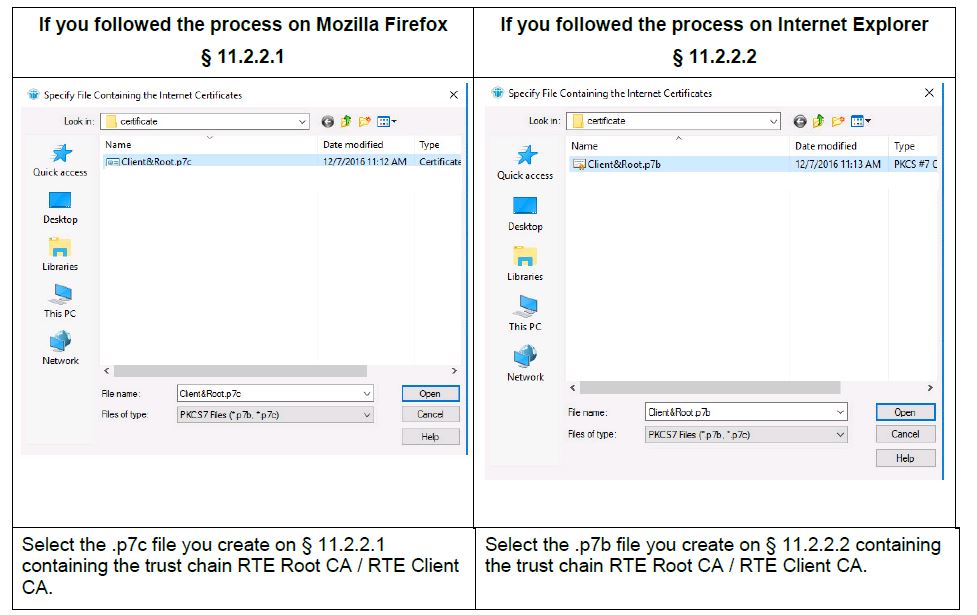
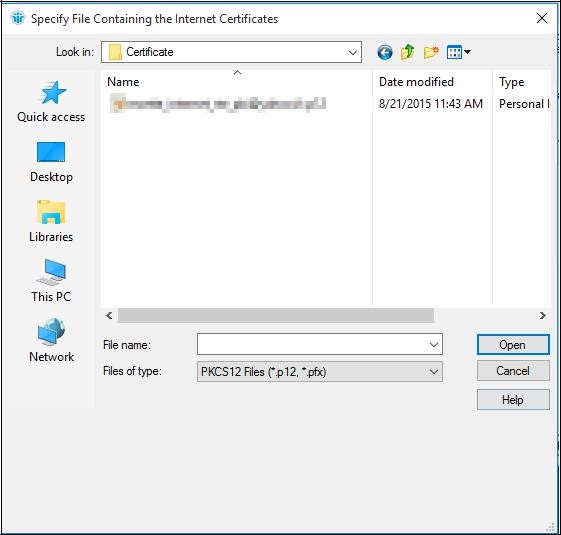
A window appears asking you to select file. Choose to see all the extensions. Select the certificate of RTE Historical AC "
Certification_Authority_RTE_2048.cer" previously downloaded:
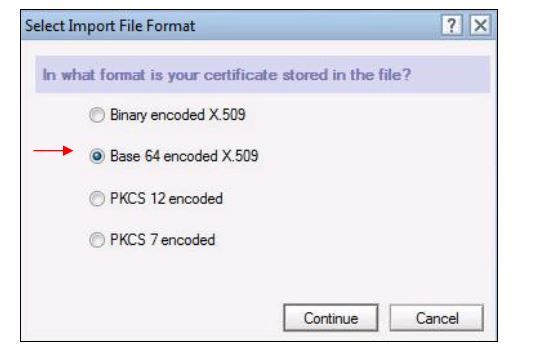
Click "
Open" and in the window below chose the format "
Base 64 encoded X.509":
Click "
Continue".
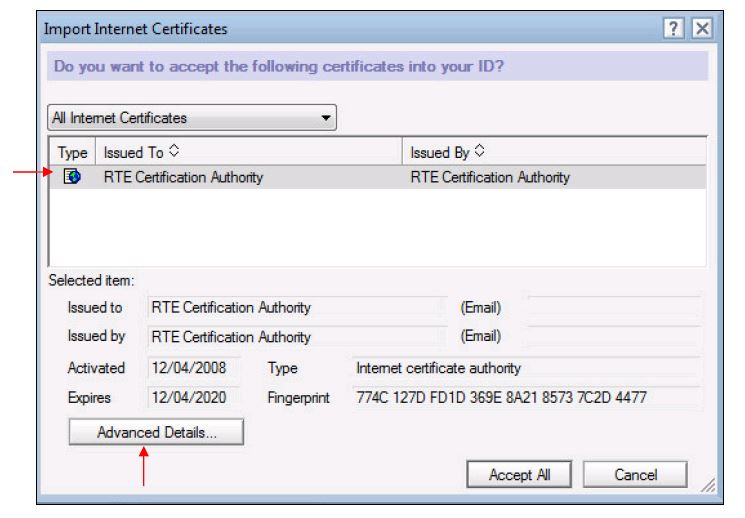
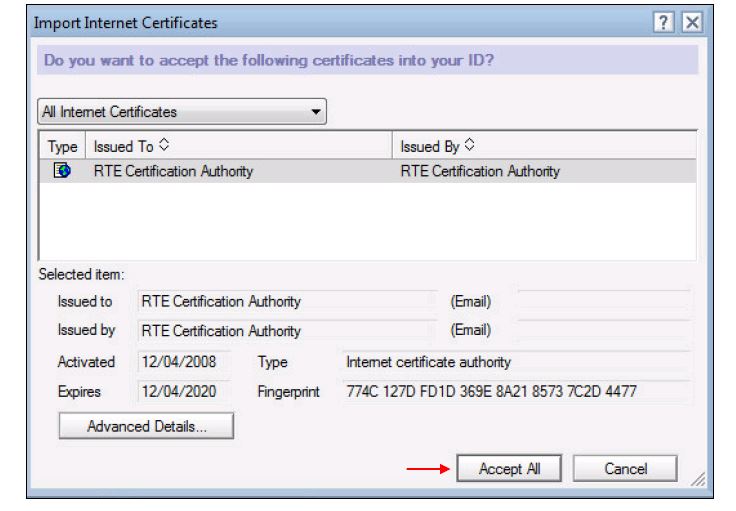
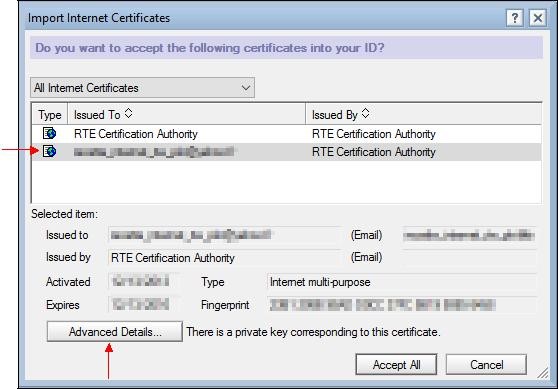
The window below is displayed:
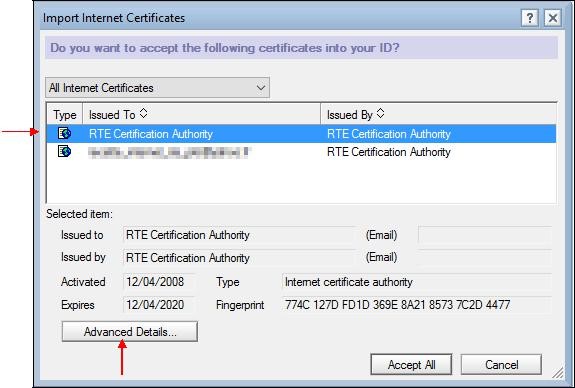
RTE Historical CA’s certificate is listed. If you click "
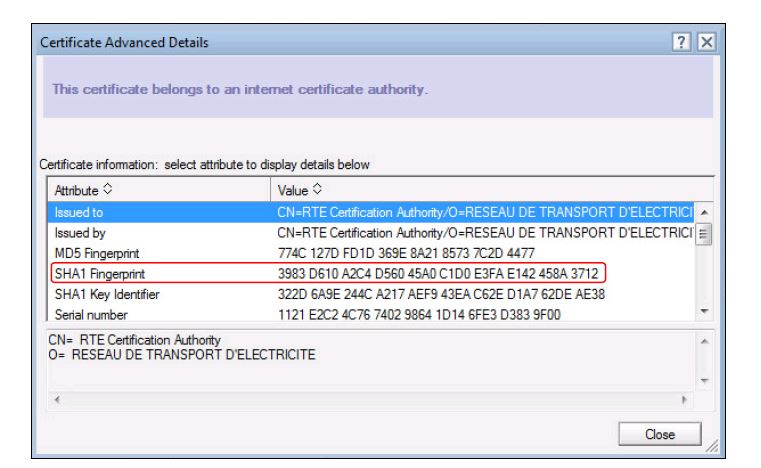
Advanced Details…" the content of the selected certificate appears in the following window:
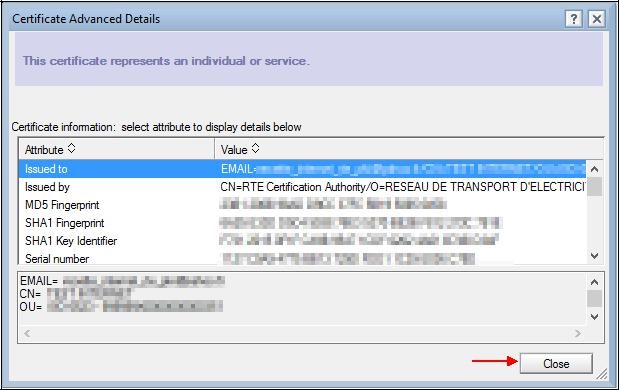
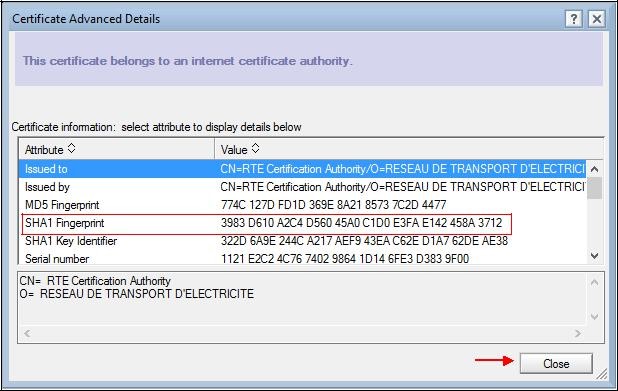
To ensure that you have downloaded the real RTE Historical CA's certificate, check carefully that the "
SHA1" hash displayed is identical to the one shown below.
Digital hash of the certificate "RTE Certification Authority" SHA1
SHA1 39:83:D6:10:A2:C4:D5:60:45:A0:C1:D0:E3:FA:E1:42:45:8A:37:12
If this is not the case: click "
Close" to go back to the precedent window and click "
Cancel" then call RTE’s Hotline (
click here).
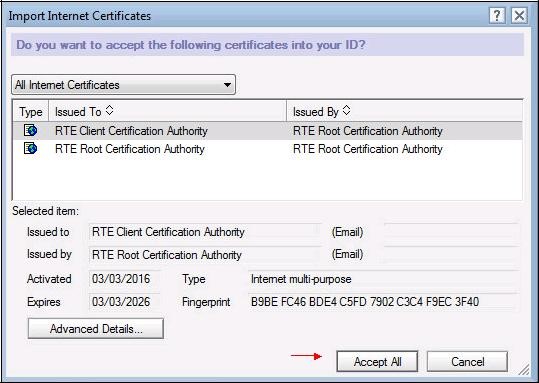
Click "
Accept All".
Click "
OK", the certificate has successfully been imported.
Installing RTE Root and RTE Client CAs certificates
In order to import the trust chain made by RTE Root CA and RTE Client CA, it requires to create a PKCS#7 file that contains the 2 certificates of these 2 CAs. To succeed in the file creation, the certificates of RTE Root and RTE Client CAs need to be imported previously in Internet Explorer certificate store or in Mozilla Firefox certificate store.
Creating P7c file containing RTE Root CA/RTE Client CA trust chain with Mozilla Firefox
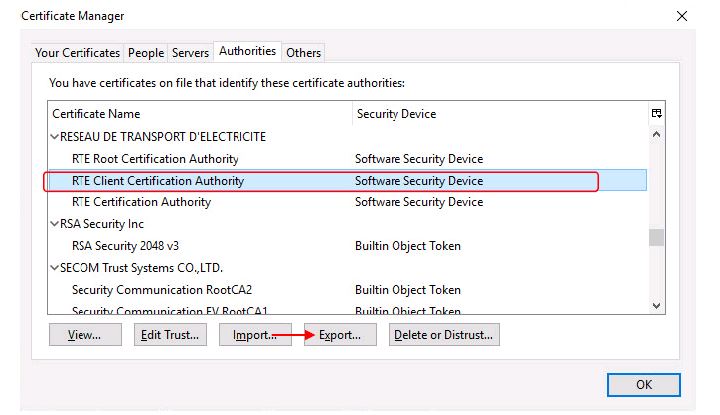
In the certificate store of Mozilla Firefox, select the RTE Client CA’s certificate "
RTE Client Certification Authority" and click on "
Export…":
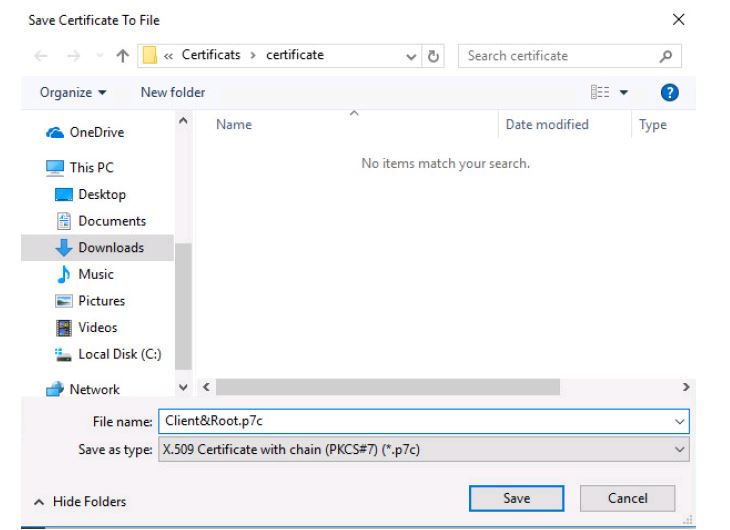
Choose where to save the file, choose the file type "
X.509 Certificate with chain (PKCS#7) (*.p7c)":
Click on "
Save".
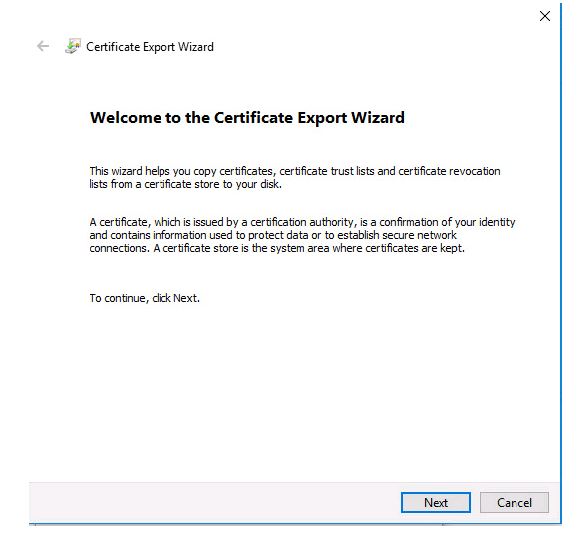
Creating P7b file containing RTE Root CA/RTE Client CA trust chain with Internet Explorer
In Internet Explorer certificate store, select the RTE Client CA’s certificate "
RTE Client Certification Authority" and click on "
Export…":
The Certificate Export wizard opens, click on "
Next":
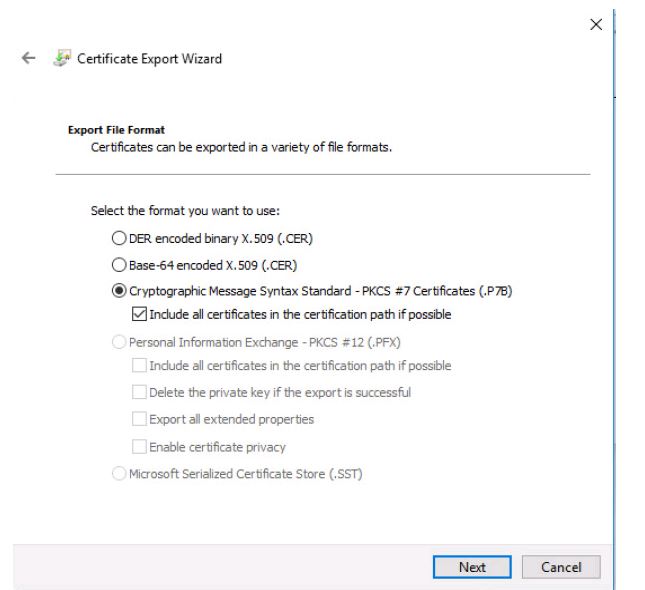
Choose "
Cryptographic Message Syntax Standart–PKCS#7 Certificates (.P7B)" option, "
Include all certificates in the certification path if possible".
Clik on "
Next".
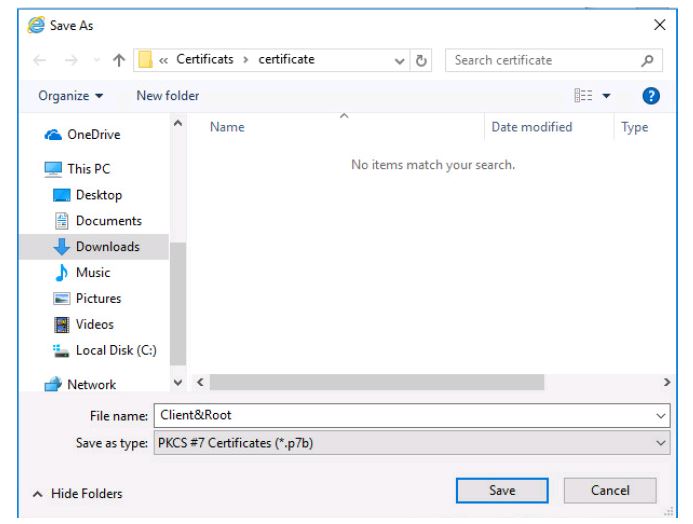
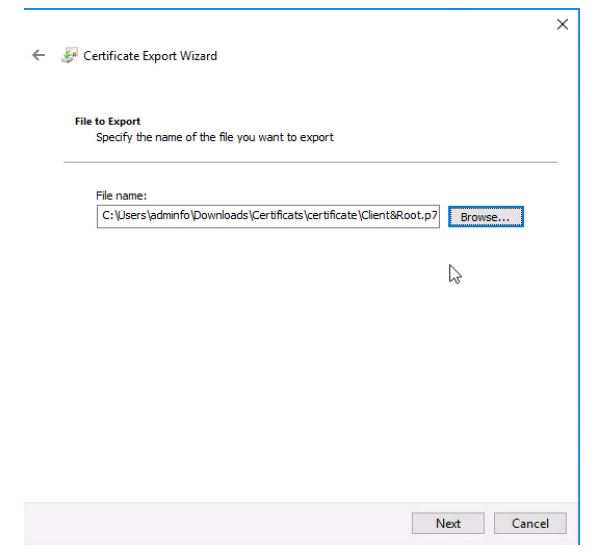
Click on "
Browse…". Choose a place ta save your .p7b file and click on "
Save":
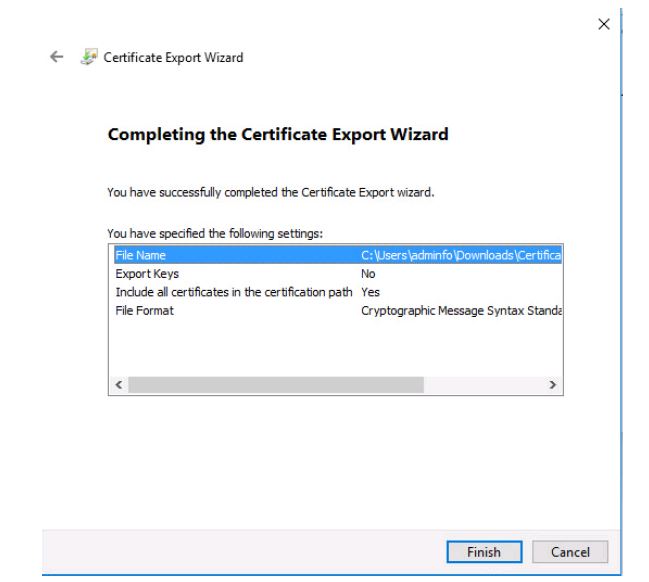
Clik on "
Next".
Clik on "
Finish".
Clik on "
Ok".
Importing PKCS7 file in Lotus Notes 9
Start Lotus Notes and access to "
File > Security > User Security…":
If requested, enter your Notes password.
The following window appears:
Click "
Your Identity" then "
Your Certificates":
Select "
Your Internet Certificates" in the drop-down list to display the Internet certificates already imported.
Click the "
Get Certificates…" button and select "
Import Internet Certificates…":
A window appears asking you to select a file, choose PKCS#7 type of file (extension "
.p7b" or "
.p7c").
- The process on Mozilla Firefox and Internet Explorer
Select the .p7c file containing the trust chain RTE Root CA / RTE Client CA.
Click "
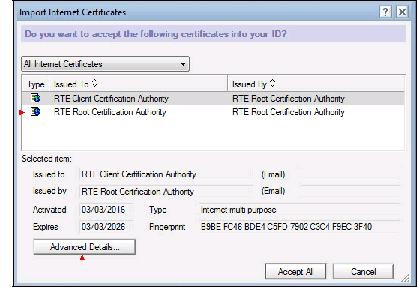
Open" and the window below is displayed:
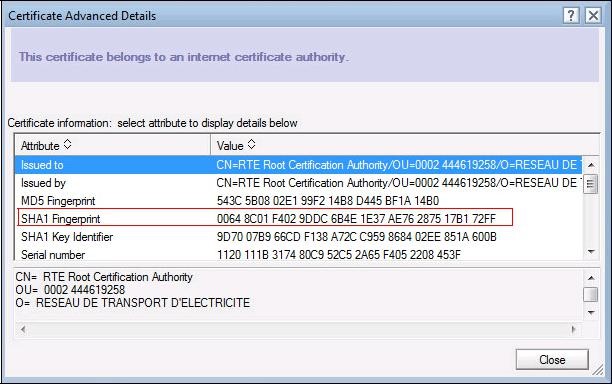
To see the content of the RTE Root CA’s certificate, you must select it.
If you click on "
Advanced Details…", a window show you the details of the selected certificate:
To ensure that you import the real RTE Root CA's certificate, check carefully that the "
SHA1" hash displayed is identical to the one shown below.
Digital hash of the certificate "RTE Root Certification Authority"
SHA1 00:64:8c:01:f4:02:9d:dc:6b:4e:1e:37:ae:76:28:75:17:b1:72:ff
If this is not the case: click "
Close" to go back to the precedent window and click "
Cancel" then call RTE’s Hotline.
Click "
Close" to return to the initial window: "
Import Internet Certificates"
To see the content of the RTE Client CA’s certificate, you must select it.
If you click on "
Advanced Details…", a window show you the details of the selected certificate:
To ensure that you import the real RTE Client CA's certificate, check carefully that the "
SHA1" hash displayed is identical to the one shown below.
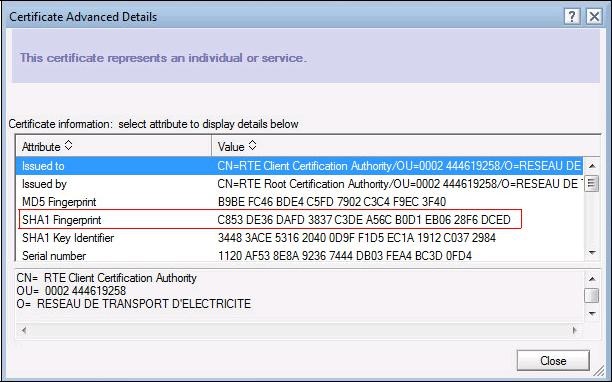
Digital hash of the certificate "RTE Client Certification Authority"
SHA1 C8:53:de:36:da:fd:38:37:c3:de:a5:6c:b0:d1:eb:06:28:f6:dc:ed
If this is not the case: click "
Close" to go back to the precedent window and click "
Cancel" then call RTE’s Hotline
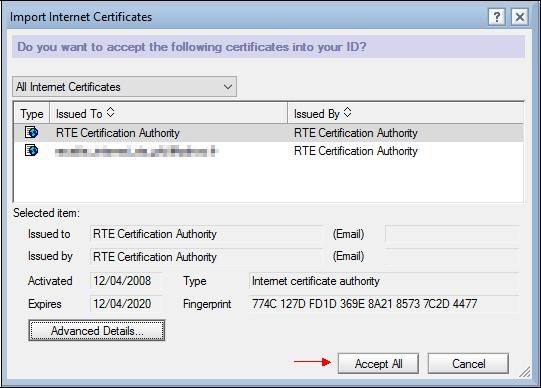
If this is the case, click "
Close" to return to the initial window: "
Import Internet Certificates".
Click on "
Accept It All"
Installing your personal certificate signed by RTE Historical CA
Creation of a PKCS#12 file readable by Notes
Lotus Notes can install a certificate and its associated private key only from a PKCS #12 file that contains the trust chain (RTE Historical CA / personal certificate). This is not the case for the file "
name_certificate.p12" you downloaded when you retrieved your certificate.
To generate a file accepted by Lotus Notes, install RTE CA’s certificate and your certificates in a browser and then export your personal certificate as a PKCS#12 file. Depending on the browser you are using, perform one of the procedures below.
- With Microsoft Internet Explorer:
- Install the three certificate of RTE CAs
- Install your personal certificate making sure to check the case "Mark this key as exportable."
- Export your certificate in a PKCS#12 file making sure to check the case "Include all certificates in the certification path if possible".
- With Mozilla Firefox:
- Install the three certificate of RTE CAs
- Install your personal certificate
- Export your certificate to a PKCS#12 file.
Installing the PKCS#12 file in Notes
Start Lotus Notes and access to "
File > Security > User Security…":
If requested, enter your Notes password.
The following window appears:
Click "
Your Identity" then "
Your Certificates":
Select "
Your Internet Certificates" in the drop-down list to display the Internet certificates already imported.
Click the "
Get Certificates…" button and select "
Import Internet Certificates…":
A window appears asking you to select a PKCS#12 file (extension "
.pfx" or "
.p12").
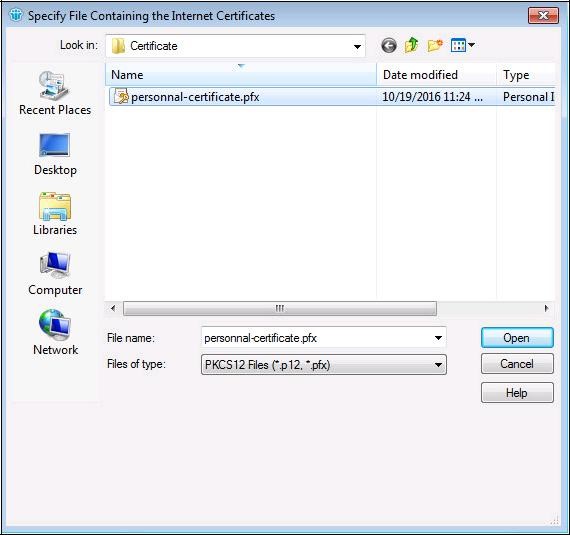
Select the file containing your personal certificate, its private key and RTE Historical CA certificate:
Click "
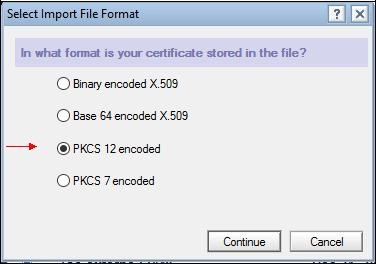
Open" and in the window below chose the format PKCS 12:
Click "
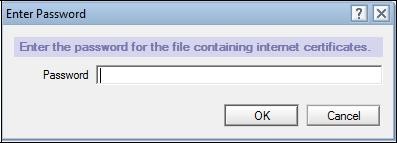
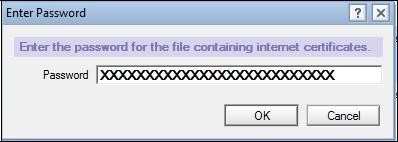
Continue". The PKCS12 file’s password is requested:
Click "
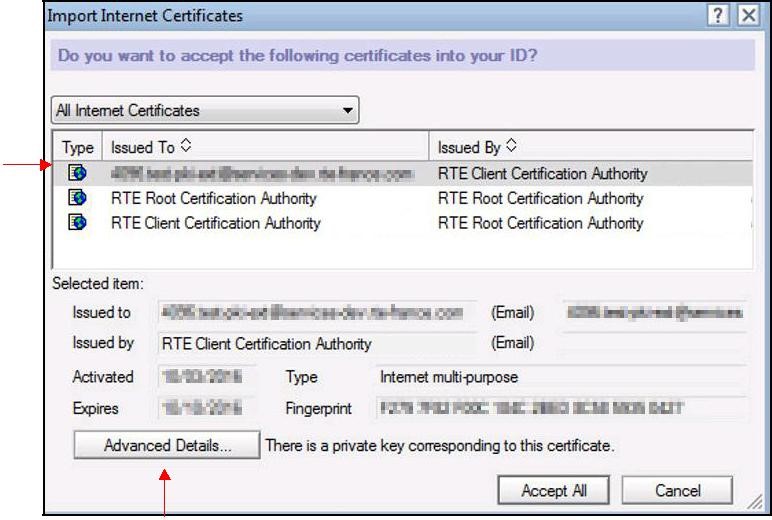
OK" and the window below is displayed:
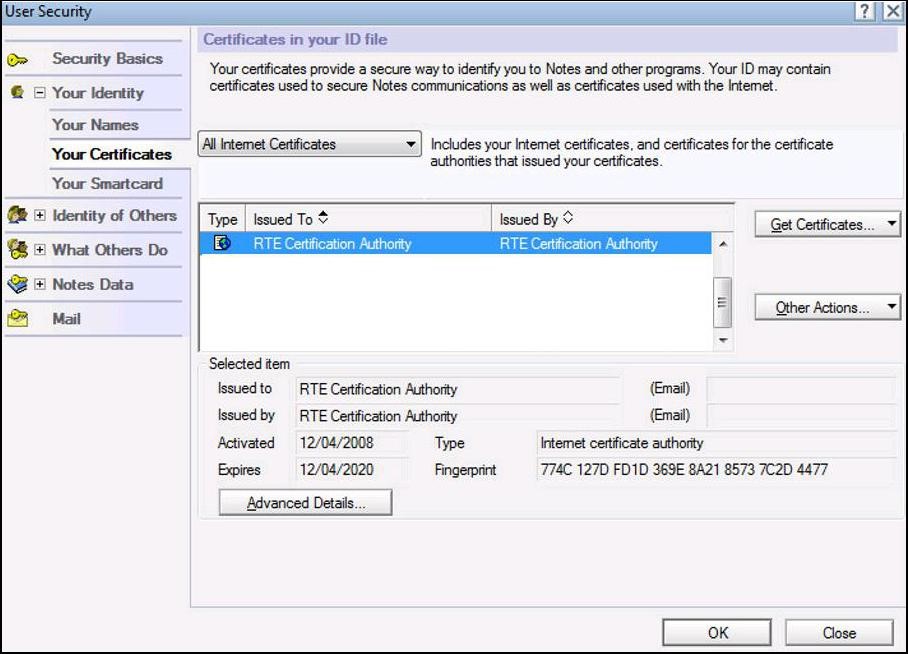
Your certificate, you want to import, and the certificate of RTE Historical CA, are listed. If you click "
Advanced Details…" the content of the selected certificate (yours) appears in the window:
Click "
Close" to go back to the previous window.
To see the content of RTE Historical CA’s certificate, you must select it:
And click "
Advanced Details…":
To ensure that you are installing the real RTE Historical CA's certificate, check carefully that the "
SHA1" hash displayed is identical to the one shown below.
Digital hash of the certificate "RTE Certification Authority" SHA1
SHA1 39:83:D6:10:A2:C4:D5:60:45:A0:C1:D0:E3:FA:E1:42:45:8A:37:12
If this is not the case: click "
Close" to go back to the precedent window and click "
Cancel" then call RTE’s Hotline (
click here).
Click "
Close" to go back to the main screen:
Click "
Accept All".
If necessary, enter your Notes password and click "
OK".
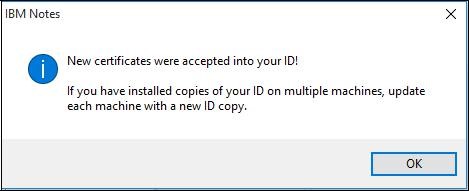
The certificate, now visible here, has successfully been imported. Click "
OK" to end the import.
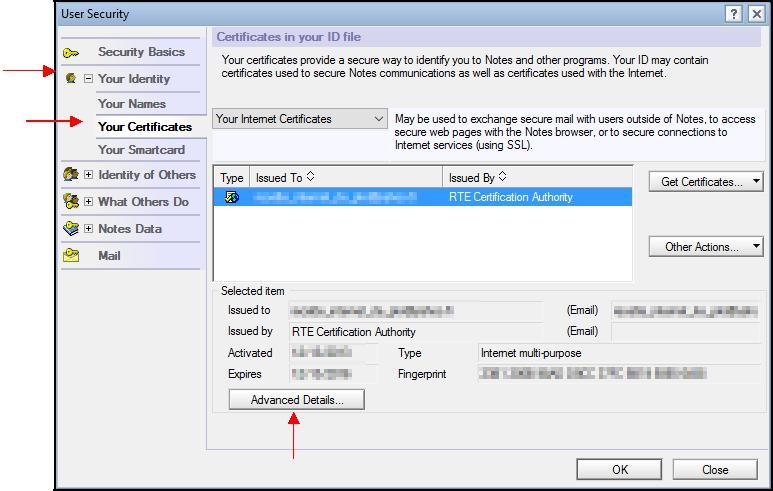
Visualization of the certificate
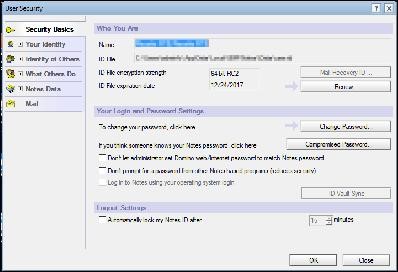
To view your certificate, access the menu "
File > Security > User Security…", then click the item "
Your Identity" and "
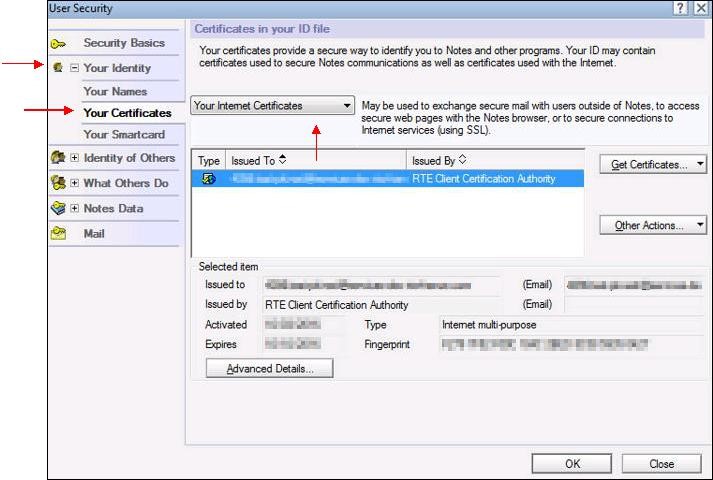
Your Certificates".
Select "
Your Internet Certificates" in the drop-down list.
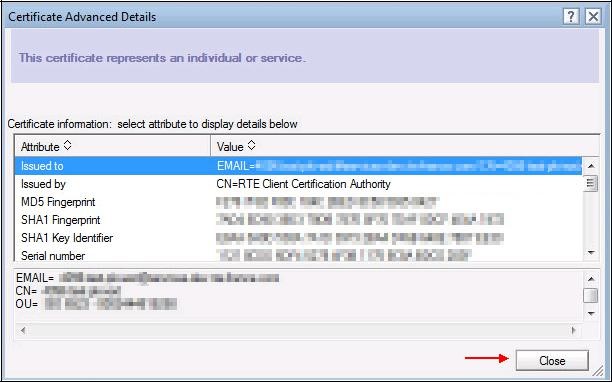
Select your personal certificate and click the "
Advanced Details…" button. The certificate’s details are then presented in the window below:
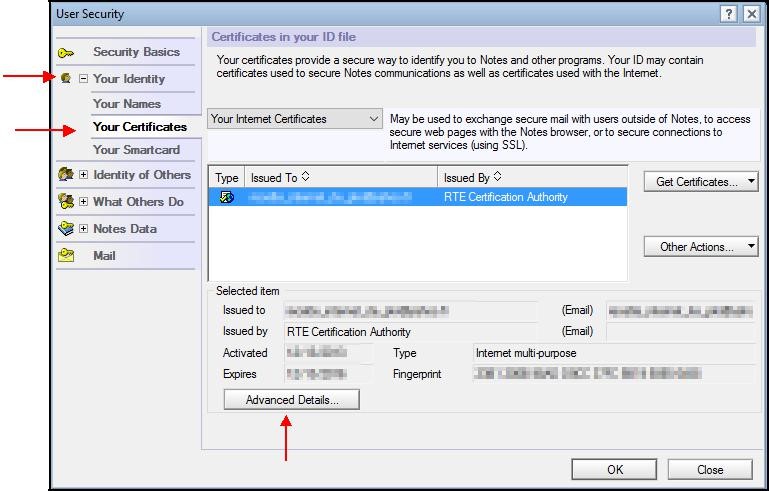
To view RTE Historical CA’s certificate, access the menu "
File > Security > User Security…", then click the item "
Your Identity" and "
Your Certificates".
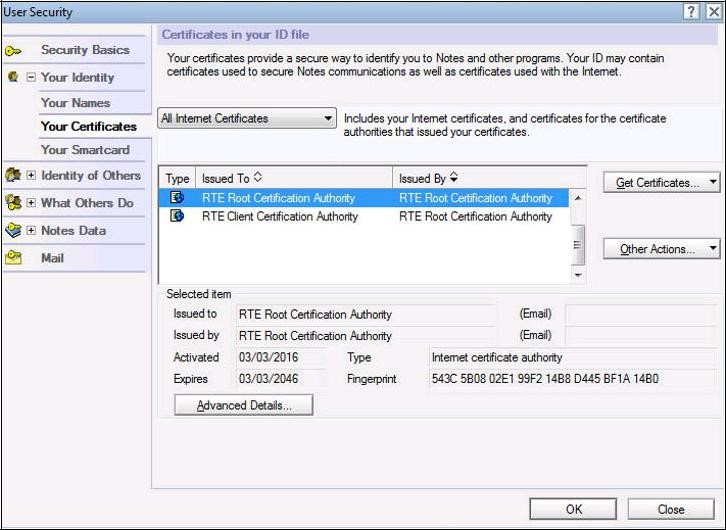
Select "
All Internet Certificates" in the drop-down list.
To see the content of RTE Historical CA’s certificate, you must select it, and click "
Advanced Details…":
To ensure that you have downloaded the real RTE Historical CA's certificate, check carefully that the "
SHA1" hash displayed is identical to the one shown below.
Digital hash of the certificate "RTE Certification Authority" SHA1
SHA1 39:83:D6:10:A2:C4:D5:60:45:A0:C1:D0:E3:FA:E1:42:45:8A:37:12
If this is not the case: click "
Close" to go back to the precedent window and click "
Cancel" then call RTE’s Hotline (
click here).
Installing your personal certificate signed by the new PKI of RTE
Creation of a PKCS#12 file readable by Notes
Lotus Notes can install a certificate and its associated private key only from a PKC #12 file that contains the trust chain (RTE Root CA / RTE Client CA / personal certificate). This is not the case for the file "
name_certificate.p12" you downloaded when you retrieved your certificate.
To generate a file accepted by Lotus Notes, install RTE CA’s certificate and your certificates in a browser and then export your personal certificate as a PKCS#12 file. Depending on the browser you are using, perform one of the procedures below.
- With Internet Explorer:
- Install the three certificate of RTE CAs
- Install your personal certificate making sure to check the case "Mark this key as exportable."
- Export your certificate in a PKCS#12 file making sure to check the case "Include all certificates in the certification path if possible"
- With Mozilla Firefox:
- Install the three certificate of RTE CAs
- Install your personal certificate
- Export your certificate to a PKCS#12 file.
Installing the PKCS#12 file in Notes
Start Lotus Notes and access to "
File > Security > User Security…":
If requested, enter your Notes password.
The following window appears:
Click "
Your Identity" then "
Your Certificates":
Select "
Your Internet Certificates" in the drop-down list to display the Internet certificates already imported.
Click the "
Get Certificates…" button and select "
Import Internet Certificates…":
A window appears asking you to select a PKCS#12 file (extension "
.pfx" or "
.p12").
Select the file containing your personal certificate, its private key and RTE Root CA and RTE Client CA certificates:
Click "
Open" and in the window below chose the format PKCS 12:
Click "
Continue". The PKCS12 file’s password is requested:
Click "
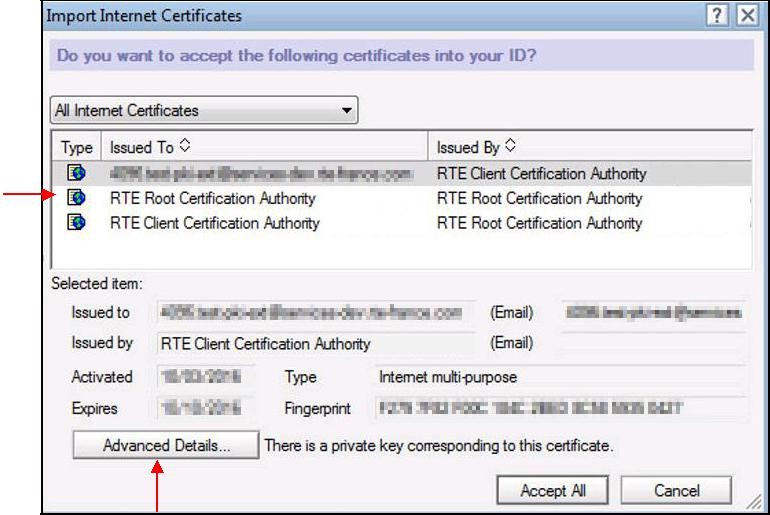
OK" and the window below is displayed:
Your certificate, you want to import, and the trust chain, are listed. If you click "
Advanced Details…" the content of the selected certificate (yours) appears in the window:
Click "
Close" to go back to the previous window.
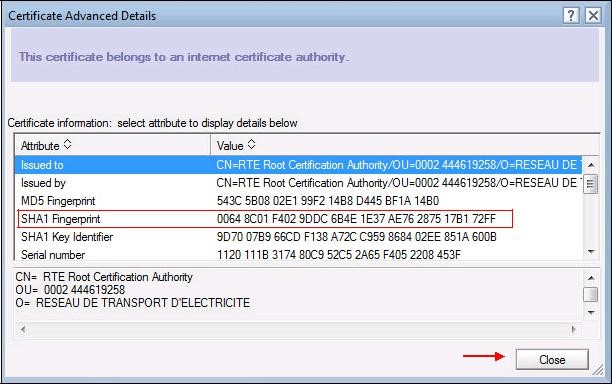
To see the content of the RTE Root CA’s certificate, you must select it.
If you click on "
Advanced Details…", a window show you the details of the selected certificate:
To ensure that you have downloaded the real RTE Root CA's certificate, check carefully that the "
SHA1" hash displayed is identical to the one shown below.
Digital hash of the certificate "RTE Root Certification Authority" SHA1
SHA1 00:64:8c:01:f4:02:9d:dc:6b:4e:1e:37:ae:76:28:75:17:b1:72:ff
If this is not the case: click "
Close" to go back to the precedent window and click "
Cancel" then call RTE’s Hotline.
Click "
Close" to return to the initial window: "
Import Internet Certificates"
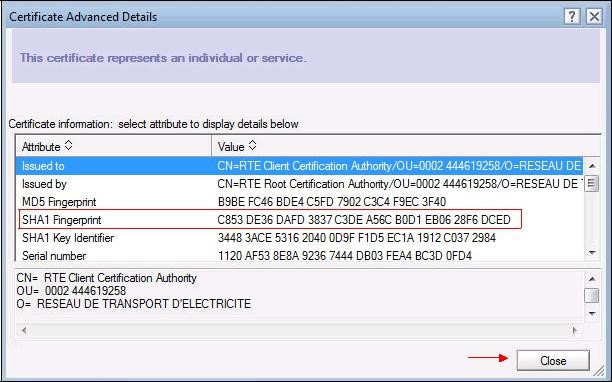
To see the content of the RTE Client CA’s certificate, you must select it.
If you click on "
Advanced Details…", a window show you the details of the selected certificate:
To ensure that you have downloaded the real RTE Client CA's certificate, check carefully that the "
SHA1" hash displayed is identical to the one shown below.
Digital hash of the certificate "RTE Client Certification Authority" SHA1
SHA1 C8:53:de:36:da:fd:38:37:c3:de:a5:6c:b0:d1:eb:06:28:f6:dc:ed
If this is not the case: click "
Close" to go back to the precedent window and click
"Cancel" then call RTE’s Hotline
If this is the case, click
"Close" to return to the initial window:
"Import Internet Certificates"
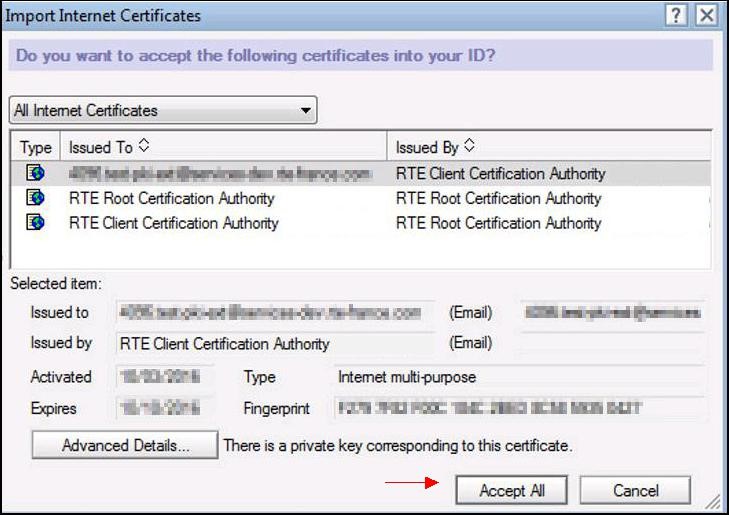
Click "
Accept All".
If necessary, enter your Notes password and click "
OK".
Click "
OK", the window below appears:
The certificate, now visible here, has successfully been imported. Click "
OK" to end the import.
Visualization of the certificat
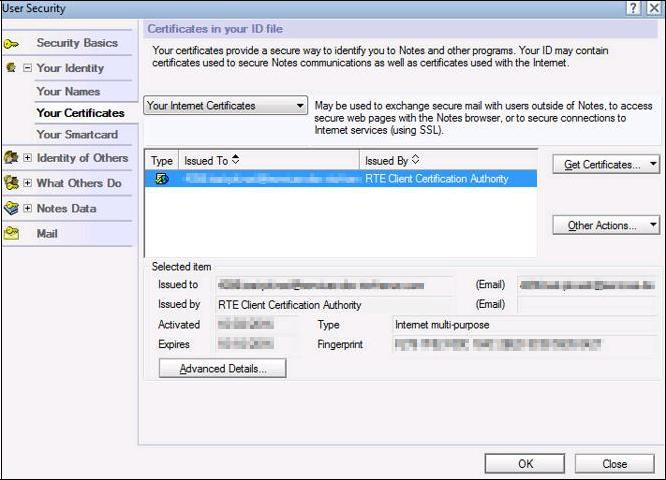
To view your certificate, access the menu "
File > Security > User Security…", then click the item "
Your Identity" and "
Your Certificates".
Select "
Your Internet Certificates" in the drop-down list.
Select your personal certificate and click the "
Advanced Details…" button. The certificate’s details are then presented in the window below:
To view RTE Root CA and RTE Client CA’s certificates, access the menu "
File > Security > User Security…", then click the item "
Your Identity" and "
Your Certificates".
Select "
All Internet Certificates" in the drop-down list.
To see the content of the RTE Root CA’s certificate, you must select it.
If you click on "
Advanced Details…", a window show you the details of the selected certificate:
To ensure that you have downloaded the real RTE Root CA's certificate, check carefully that the "
SHA1" hash displayed is identical to the one shown below.
Digital hash of the certificate "RTE Root Certification Authority"
SHA1 00:64:8c:01:f4:02:9d:dc:6b:4e:1e:37:ae:76:28:75:17:b1:72:ff
If this is not the case: click "
Close" to go back to the precedent window and call RTE’s Hotline.
Click "
Close" to return to the initial window.
To see the content of the RTE Client CA’s certificate, you must select it.
If you click on
"Advanced Details…", a window show you the details of the selected certificate:
To ensure that you have downloaded the real RTE Client CA's certificate, check carefully that the "
SHA1" hash displayed is identical to the one shown below.
Digital hash of the certificate "RTE Client Certification Authority" SHA1
SHA1 C8:53:de:36:da:fd:38:37:c3:de:a5:6c:b0:d1:eb:06:28:f6:dc:ed
If this is not the case: click
"Close" to go back to the precedent window and call RTE’s Hotline
Click
"Close" to return to the initial window.
Email account configuration
If you have multiple certificates used to sign your sent messages, you have to set by default the one that will serve for exchanges with RTE.
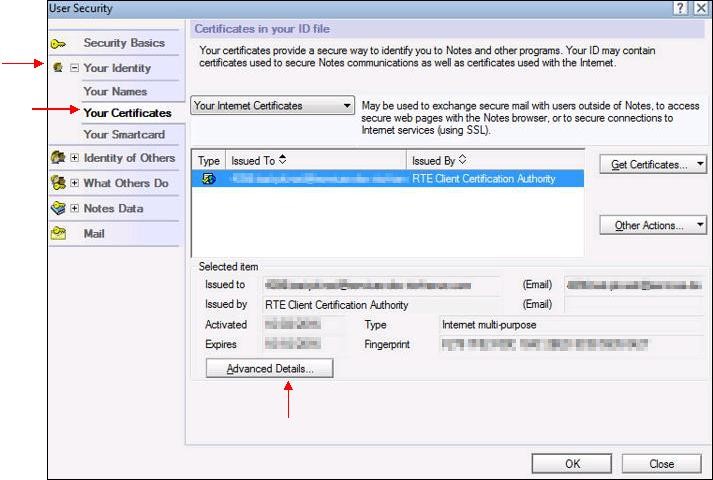
In Lotus Notes, open the menu "
File > Security > User Security…", then click "
Your Identity" and "
Your Certificates":
Select "
Your Internet Certificates" in the drop-down list to display your Internet certificates that are already imported.
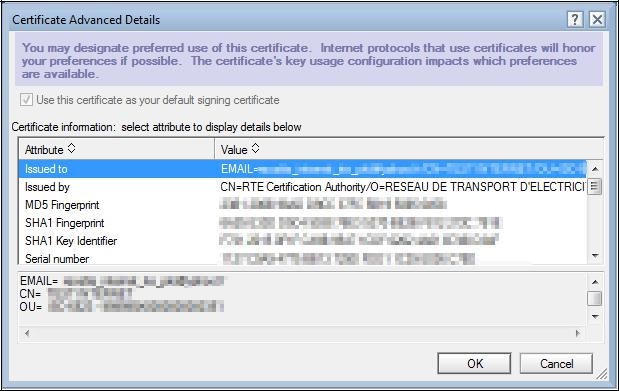
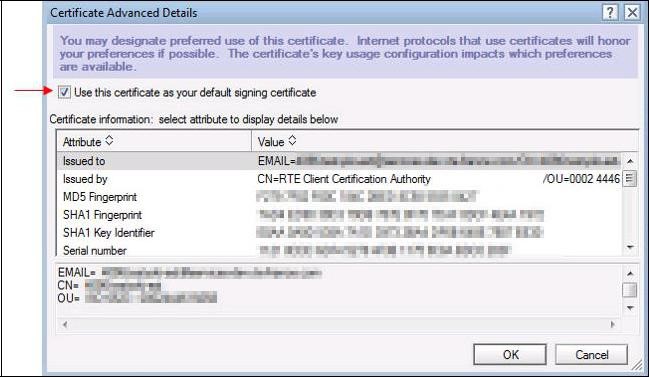
Select your certificate and click the "
Advanced Details" button.
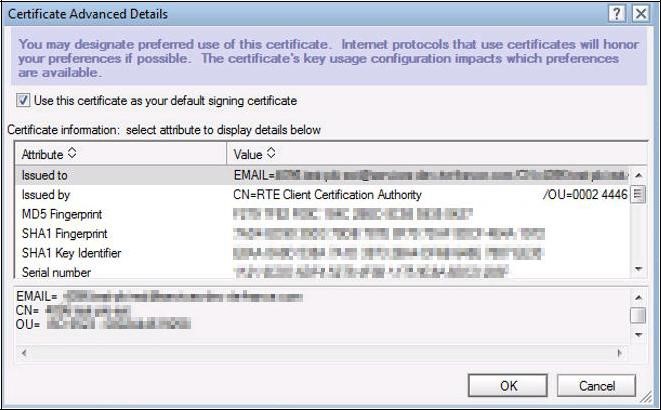
If you only have one certificate, the case "
Use this certificate as your default signing certificate" will be grey and checked. If not, check it, as above, and click "
OK".
Installing RTE’s application certificate
When you select, for the first time, a signed and encrypted message you received a dialog box similar to the one below appears, allowing you to give your trust to the issuer:
For this, you must click on the
"Cross certify" button.
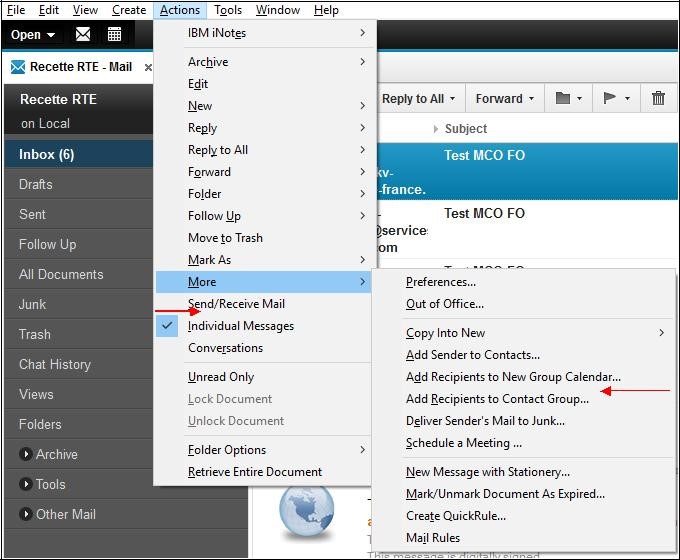
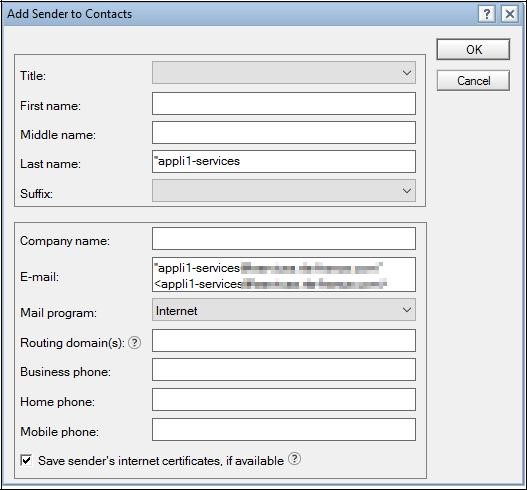
Then, when you display this signed received message, you will need to choose the
"Add Sender to Contacts…" feature, which will add the issuer and its certificate to your book Address.
The following window appears:
Only verify that the case
"Include X.509 certificates when encountered" is checked and click
"OK".
Whenever an encrypted email will be sent to this application, its installed certificate will now automatically be selected to perform the encryption.
Using the certificate: sending a signed-encrypted email
When composing a message, you can sign and encrypt it if you have your own and correspondent certificate (see the import procedure for your certificate above).
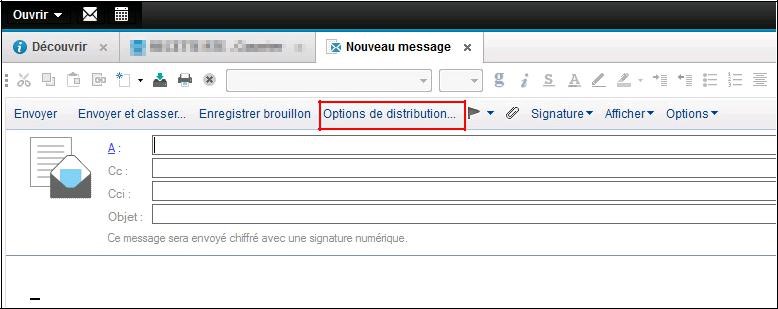
For that, when you write a new message, you must click the
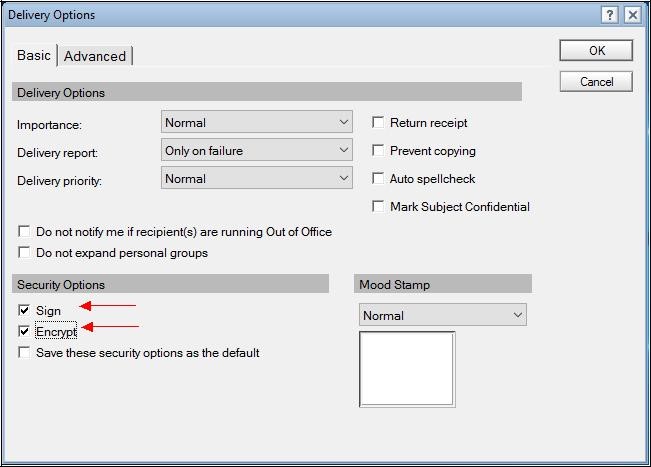
"Delivery Options" button and check the
"Sign" and
"Encrypt" cases as shown below:
Click "
OK".
That is all, Notes then automatically signs and encrypts your message.